CodeBuddy Best Practices Guide - Progressive Learning Path
From zero foundation to advanced practices, systematically master CodeBuddy AI programming skills
Learning Path Overview
This guide follows the principle of progressive learning, dividing CodeBuddy best practices into four levels to help developers of different skill levels gradually master AI programming skills.
text
Basic Introduction → Advanced Techniques → Engineering Practices → Advanced ApplicationsLevel 1: Basic Introduction
Target Audience: AI programming beginners, CodeBuddy newcomers Learning Objectives: Master basic operations, establish AI programming mindset
1.1 Quick Start Practice
Building a Personal Blog Website from 0 to 1
- Core Value: Complete project with zero coding foundation
- Practice Highlights: Plan Mode usage, project planning mindset
- Suitable Scenarios: Complete beginners who want to quickly experience AI development
Detailed Practice Operations: Click "Building a Personal Blog Website from 0 to 1" for more details
Step 1: Requirements Analysis and Planning
- Open CodeBuddy, select Plan Mode
- Describe blog requirements: "I want to create a personal tech blog with article display, category management, and comment functionality"

- AI automatically generates project structure: Frontend (React/Vue), Backend (Node.js), Database (MongoDB)
- Confirm tech stack selection and functional module division
Step 2: Rapid Prototype Development
- Use AI to generate project scaffolding and basic code structure
- Implement core functional modules: homepage, article list, article details, admin backend
- Integrate modern UI component libraries (such as Ant Design or Material-UI)
- Add responsive design and basic styling
Step 3: Feature Enhancement and Optimization
- Implement CRUD operations for articles and category management
- Add search functionality and tag system
- Integrate Markdown editor and code highlighting
- Implement comment system and user interaction features
Step 4: Deployment and Launch
Use CloudStudio or CloudBase for one-click deployment
- Create a todo web application
* Deploy todo web application to CloudStudio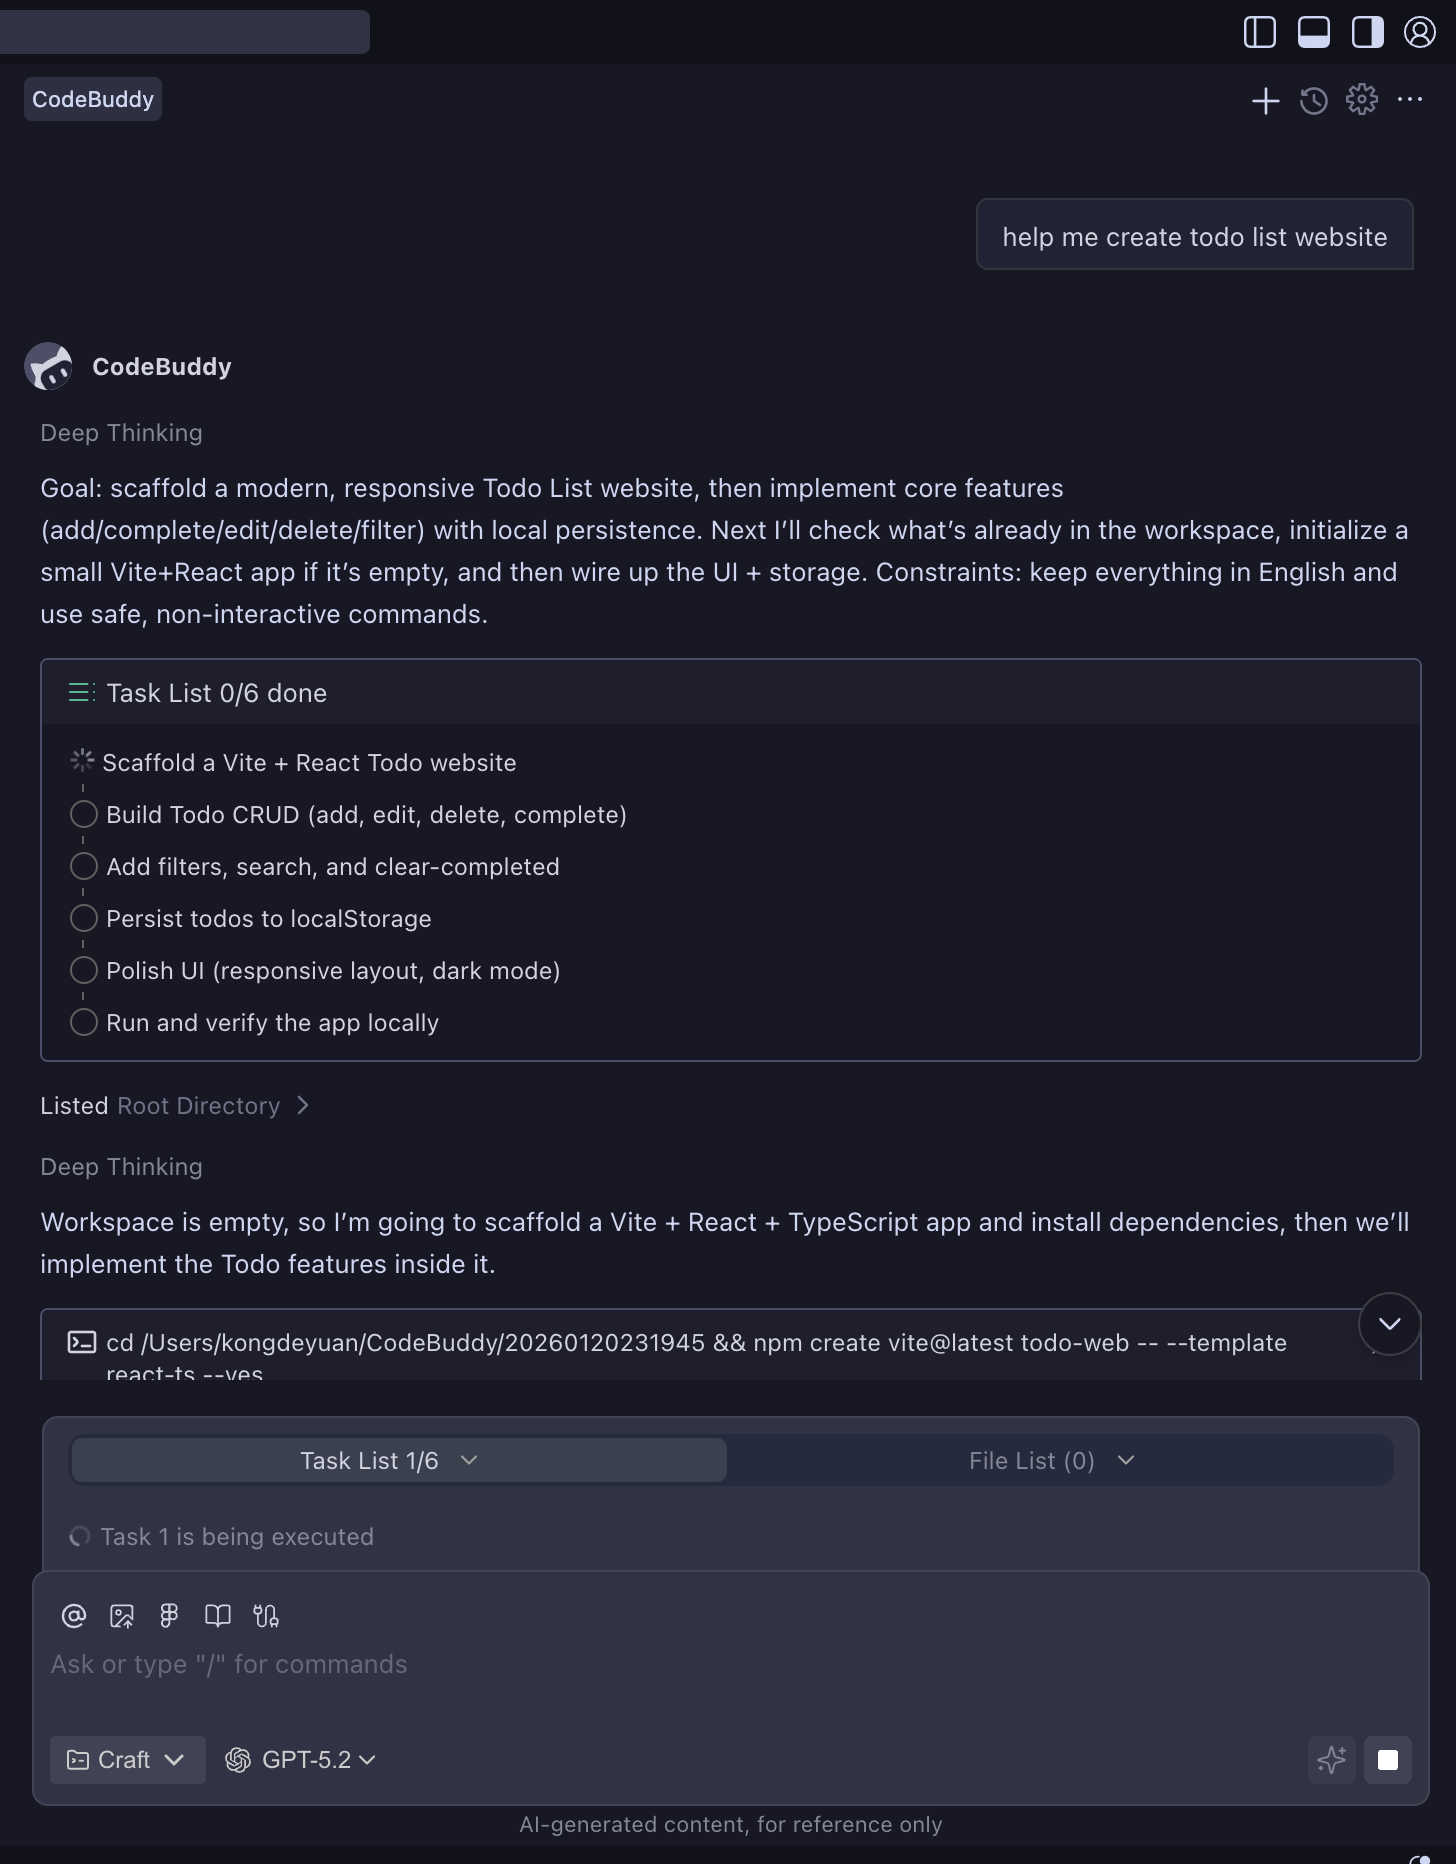
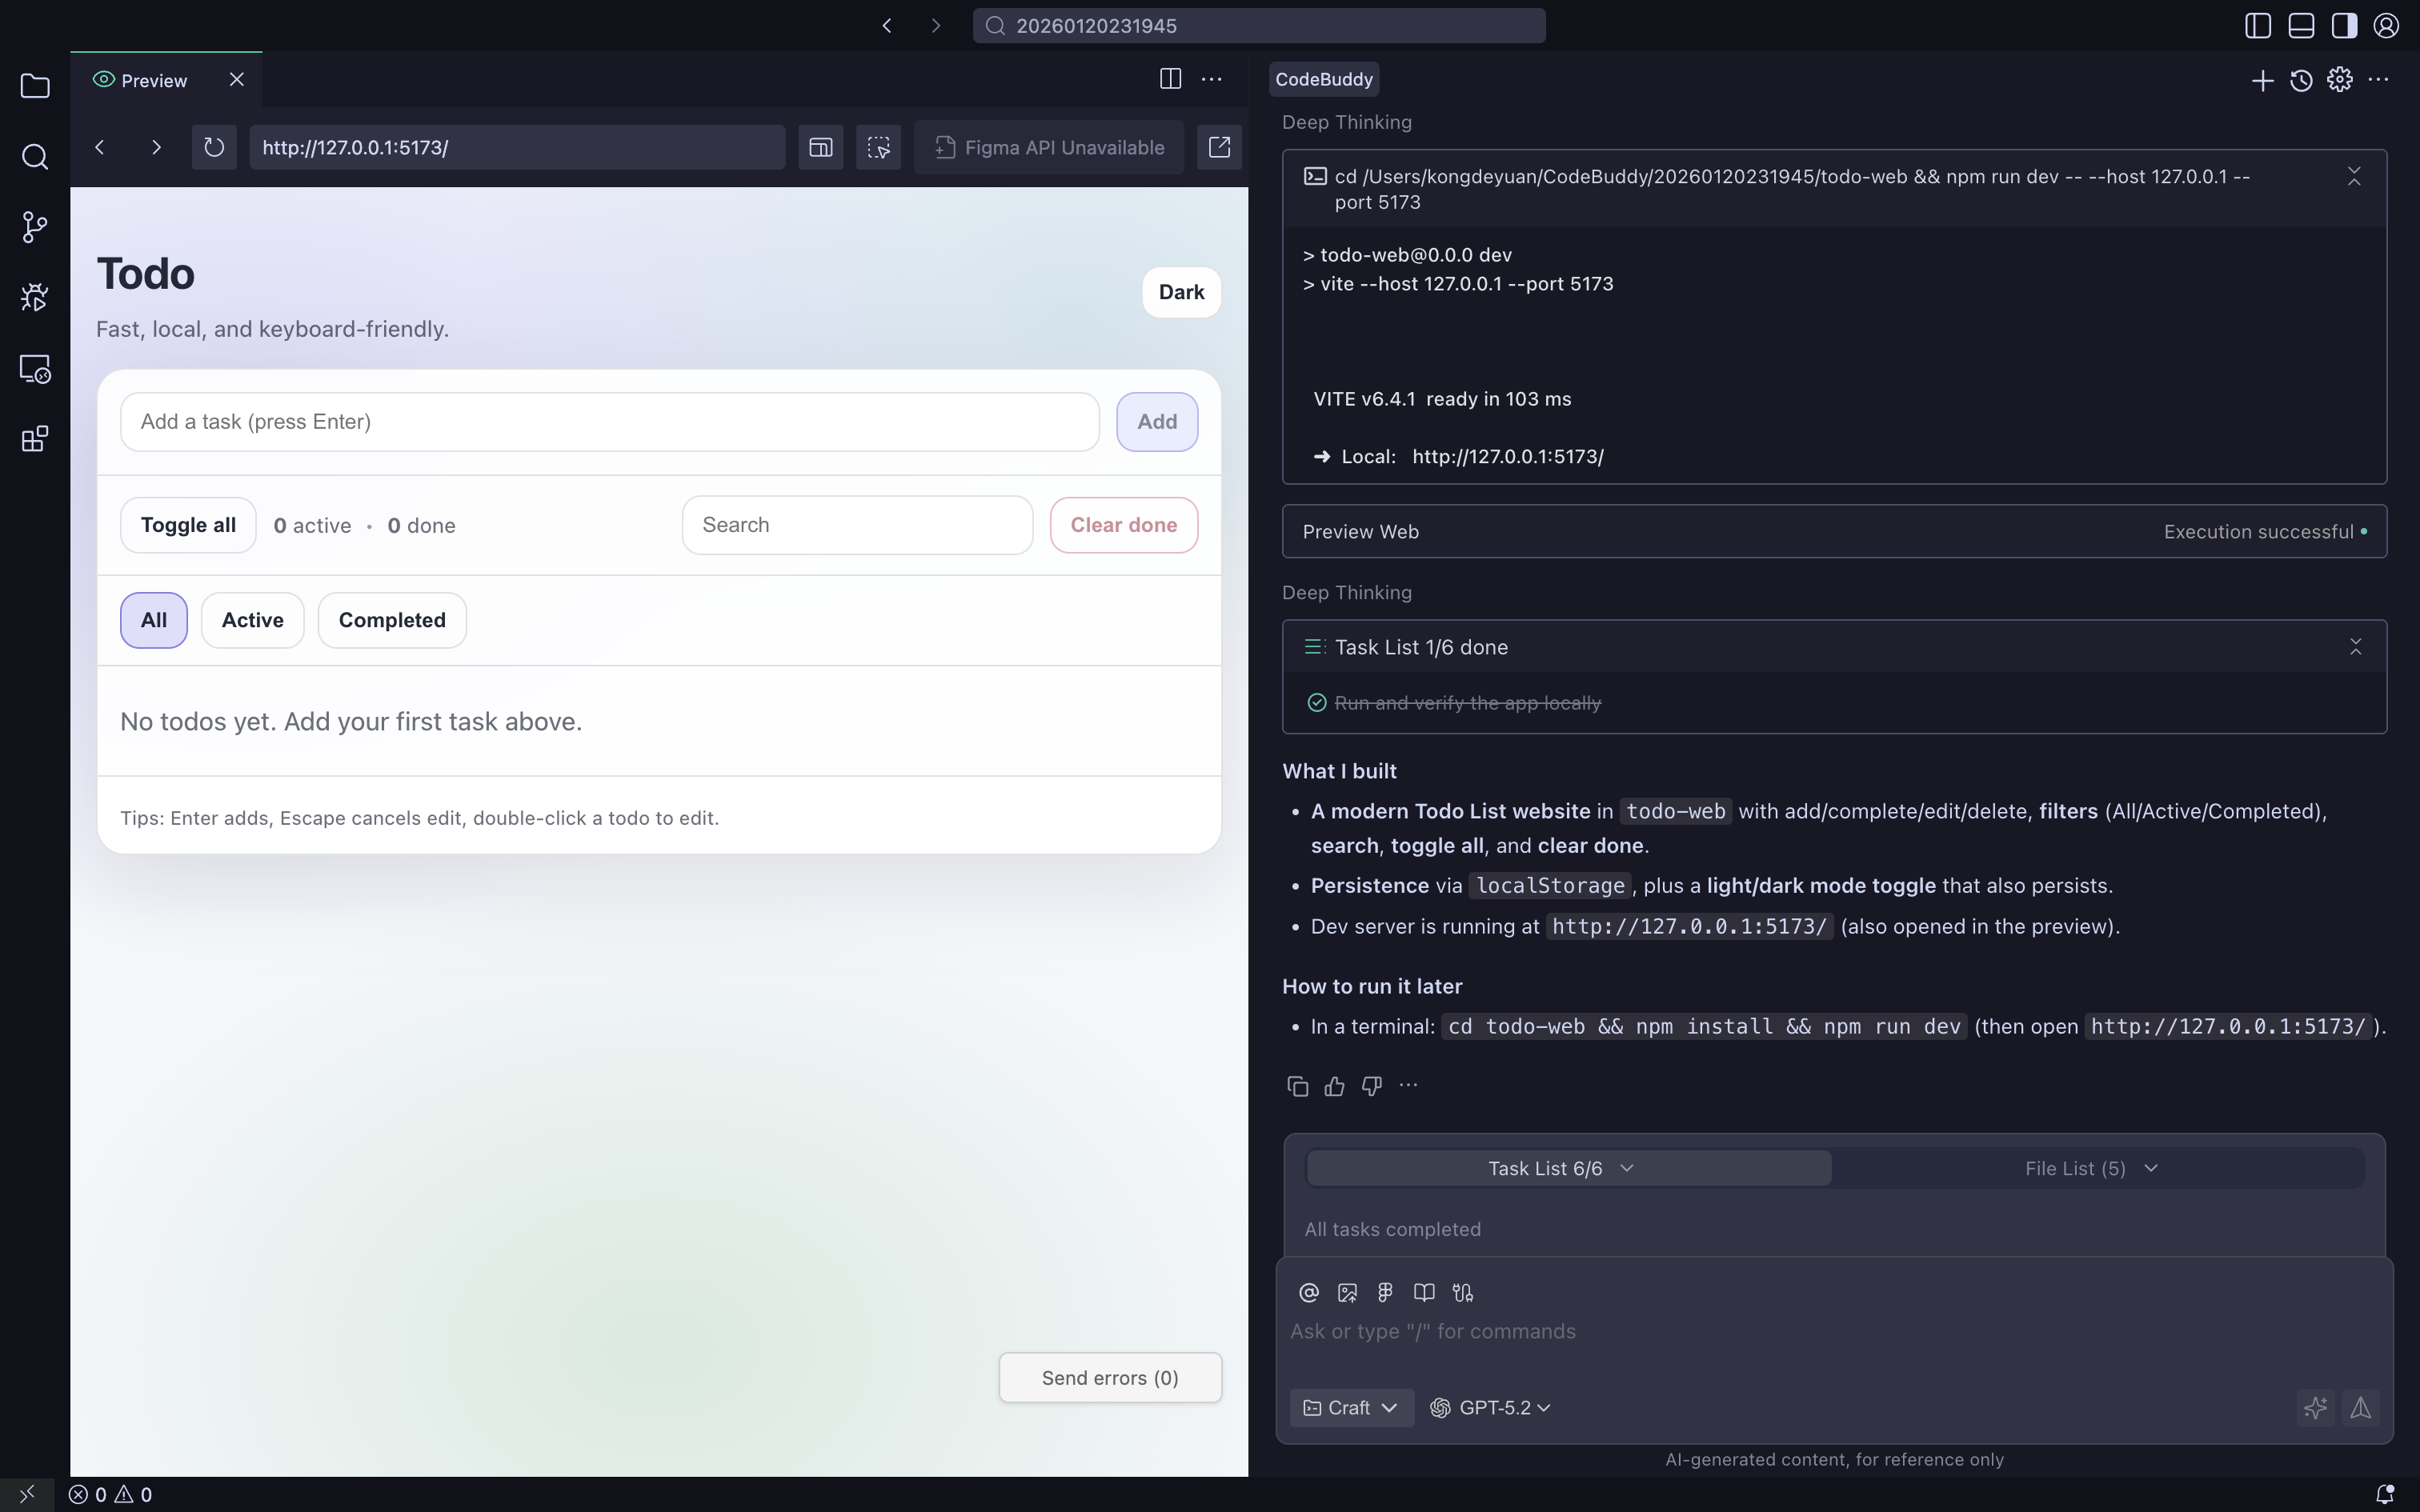
- Create a todo web application Link
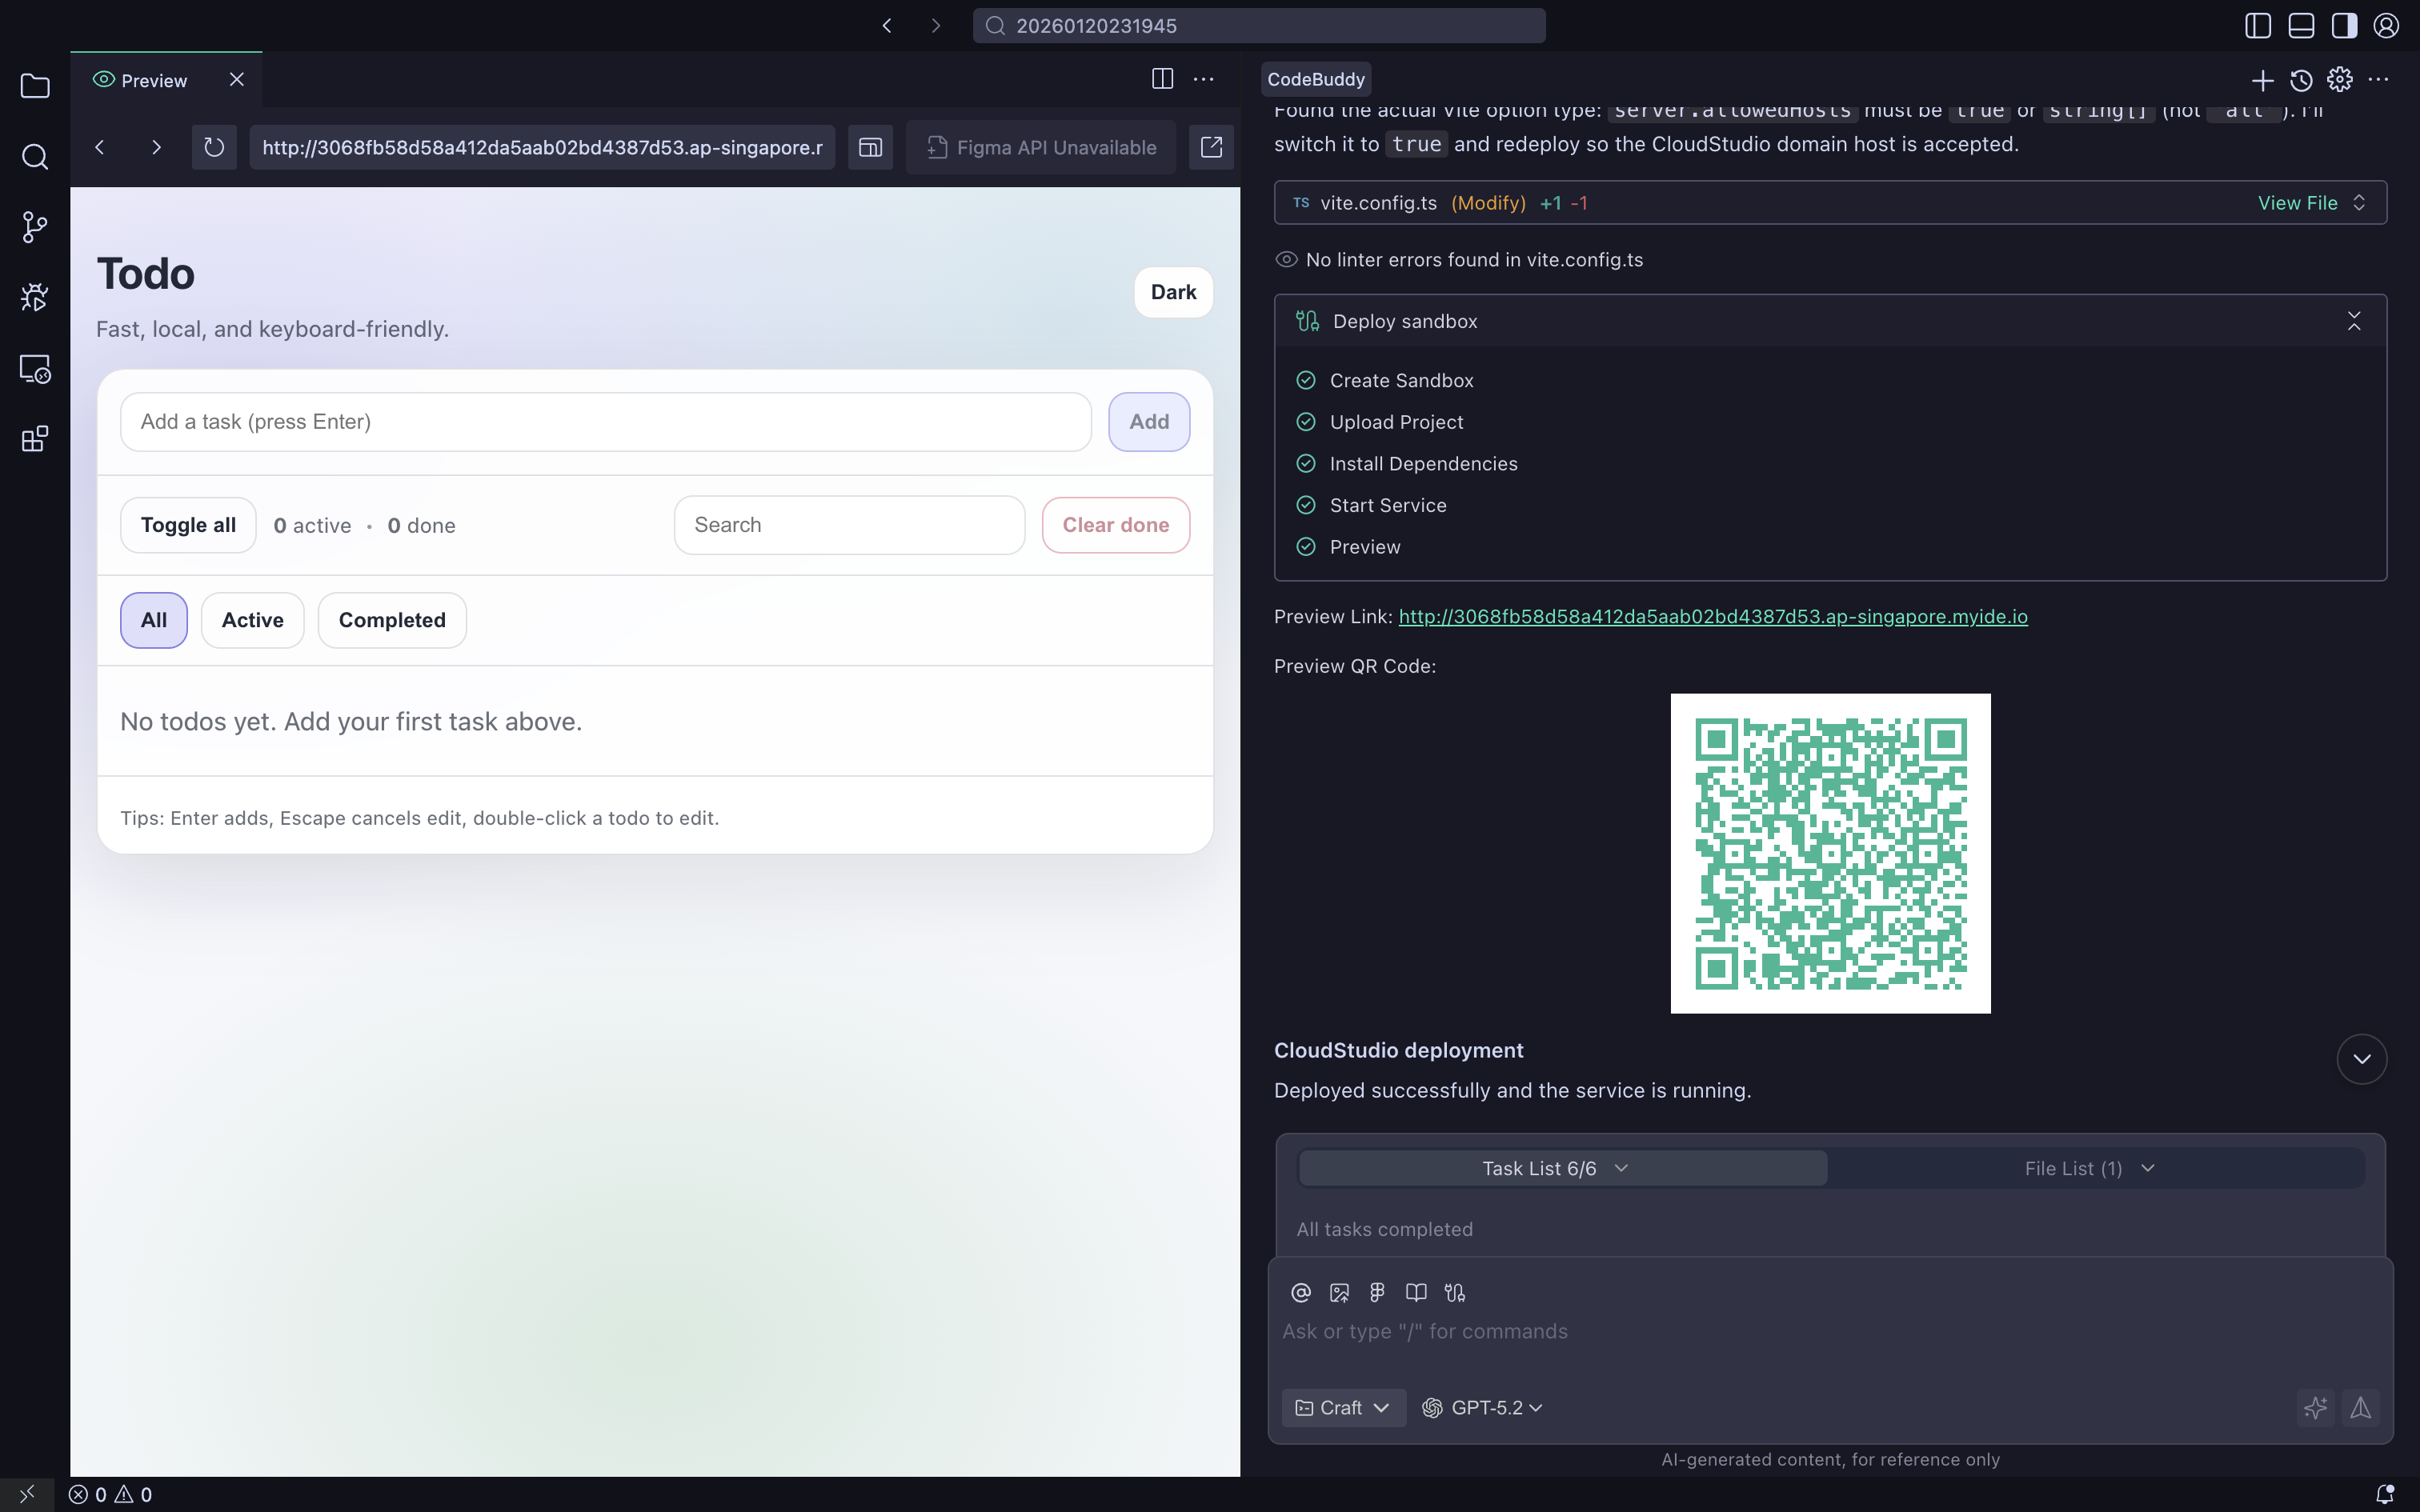
Configure custom domain and HTTPS certificate
Set up CDN acceleration and performance optimization
Obtain accessible online blog address

1.2 Product Validation and Prototyping
How to Quickly Generate Demonstrable Prototypes
- Core Value: Quickly validate product concepts, reduce trial and error costs
- Practice Highlights: MVP mindset, prototype design, user validation
- Suitable Scenarios: Startup teams, product managers validating ideas and concepts
Detailed Practice Operations: Click "How to Quickly Generate Demonstrable Prototypes" for more details
Step 1: GENIUS for MVP Framework Application
Core Validation Three Questions:
- What is the core hypothesis we want to validate? (Rather than "building a product")
- What is the minimum evidence to validate this hypothesis? (User behavior, feedback, willingness to pay)
- To what extent does the prototype need to be built to obtain evidence? (Real backend vs fake data)
MVP Three-Layer Pyramid:
- Concept Layer: Can users understand the value proposition and find it "interesting"
- Process Layer: Can they smoothly complete 1-2 core tasks in the prototype
- Value Layer: Are they willing to pay a price for it (time, data, money)
Step 2: Efficient Construction Pipeline
Technical Implementation Path:
- Rapid Skeleton Generation: Use tools like v0, Bolt.new to build basic framework in 30 minutes
- Local Enhancement Optimization: Use CodeBuddy to improve skeleton interaction and API integration
- Template Reuse: Precipitate successful patterns into reusable MVP templates
Actual Case: Travel Vertical MVP
- Original idea: "Help young people plan weekend short trips"
- User research revealed real needs: avoid being cheated, avoid pitfalls, avoid hassle
- Converged hypothesis: "One-click generation of travel plans with real reviews + bookable links"
- 2-hour Spec: Single homepage entry, three-module plan, 3 cities support, payment redirection
Step 3: Spec-Driven MVP Development
Lightweight Spec Includes:
- Background and Goals: Solve whose what problem
- Core User Stories: "As XX, I hope to XX, so I don't have to XX"
- Golden Path Process: Simple description of Step 1/2/3
- Acceptance Criteria: What behavior counts as "this iteration complete"
Development Chain:
- Vibe Plan: AI upgrades ideas to structured requirements and user stories
- Vibe Design: Automatically generate wireframes/high-fidelity interfaces based on requirements
- Vibe Coding: Generate code under Spec constraints, avoid "feeling-based" development
- Vibe Deploy: One-click deployment and launch in CodeBuddy
Step 4: Rapid Iteration Learning Loop
User Signal Capture:
- Strong Behavioral Signals: Active sharing, recommending to friends, multiple uses
- Strong Text Signals: Serious feedback, not just "okay, pretty good"
- Strong Emotional Signals: "Wow, this works" vs "This doesn't help me"
AI-Assisted Analysis:
- Automatically summarize user behavior patterns
- Cluster and organize feedback opinions
- Extract 3-5 "next most important things to change"
- Form "Spec → Prototype → Data → New Spec" closed loop
1.3 Modern Development Paradigms
Vibe Coding Development Best Practices: Building Modern Login Systems
- Core Value: Master visual-first modern frontend development philosophy
- Practice Highlights: Component-based development, parameterized theming, fluid interactions
- Suitable Scenarios: Frontend developers improving UI/UX design and implementation capabilities
Detailed Practice Operations: Click "Vibe Coding Development Best Practices: Building Modern Login Systems" for more details
Step 1: Establish Vibe Coding Design Thinking
Core Concepts:
- Visual First: Establish visual style (lighting, texture, color) before writing logic
- Fluid Interactions: UI provides delicate feedback to user operations
- AI Synergy: Use CodeBuddy AI to quickly generate boilerplate code
Design Style Selection: Glassmorphism Tech Blue UI
- Glassmorphism design style combined with tech blue tones
- Semi-transparent effects and soft shadows create layered spatial sense
- Modern, lightweight, and professional visual experience
Step 2: Built-in Component Ecosystem Rapid Development
Tech Stack Configuration:
json{ "Framework": "React 18 (TypeScript)", "Build Tool": "Vite", "UI Component Library": "shadcn/ui", "Styling Solution": "Tailwind CSS", "Form Handling": "React Hook Form", "Form Validation": "Zod" }shadcn/ui Component Library Advantages:
- Avoid reinventing the wheel with basic UI components
- Directly call high-quality components that have been design-polished
- Ensure accessibility and interaction details
- Focus on business logic and "Vibe" adjustments
Step 3: Parameterized Theming System Implementation
10-Second Theming Core Technology:
- Modify Tailwind color class names for quick theming
- Change from
bg-indigo-500tobg-emerald-500 - Login page transforms from "cyber tech style" to "natural forest style"
- No need to touch core interaction logic or animation curves
Practical Application Scenarios:
- Adapt to new product brand colors, avoid rewriting large amounts of CSS
- Avoid style conflicts, improve development efficiency
- Support multi-theme switching, meet different user preferences
Step 4: Standardized Premium Micro-interactions
Core Feature Implementation:
- Email Password Login: Real-time input validation and friendly error prompts
- Third-party OAuth Login: Seamless GitHub and Google redirection
- User Experience Optimization: "Remember me" option, forgot password, loading state feedback
- Responsive Design: Consistent experience on desktop and mobile
Micro-interaction Details:
- Input field breathing effects
- Button streaming animations
- Form validation real-time feedback
- Loading state smooth transitions
Interaction Baseline Standardization:
- Build Vibe templates with perfect micro-interactions
- Become company interaction baseline, ensure consistent experience across product lines
- Reduce design restoration communication costs
- Developers of different levels can produce high-quality interactions
Level 2: Advanced Techniques
Target Audience: Developers with some programming foundation who want to improve efficiency Learning Objectives: Master efficient workflows, improve development efficiency
2.1 Efficiency Tool Mastery
AI Programming Practice Based on CodeBuddy Custom Commands
- Core Value: From repetitive input to one-click trigger, reshape AI usage experience
- Practice Highlights: Custom command creation, templated workflows
- Suitable Scenarios: Developers and teams hoping to improve AI usage efficiency
Detailed Practice Operations: Click "AI Programming Practice Based on CodeBuddy Custom Commands" for more details
Step 1: Identify Repetitive Task Scenarios
- Daily Report Generation Scenario: Daily need to write work summaries and next-day plans
- TAPD Requirement Creation: Frequently create requirement tickets, fill repetitive fields
- Code Review Scenario: Check code for security, performance, and compliance
- Todo Query: Cross-system TAPD todo queries, generate plans by priority
Step 2: Create Project-Level Custom Commands
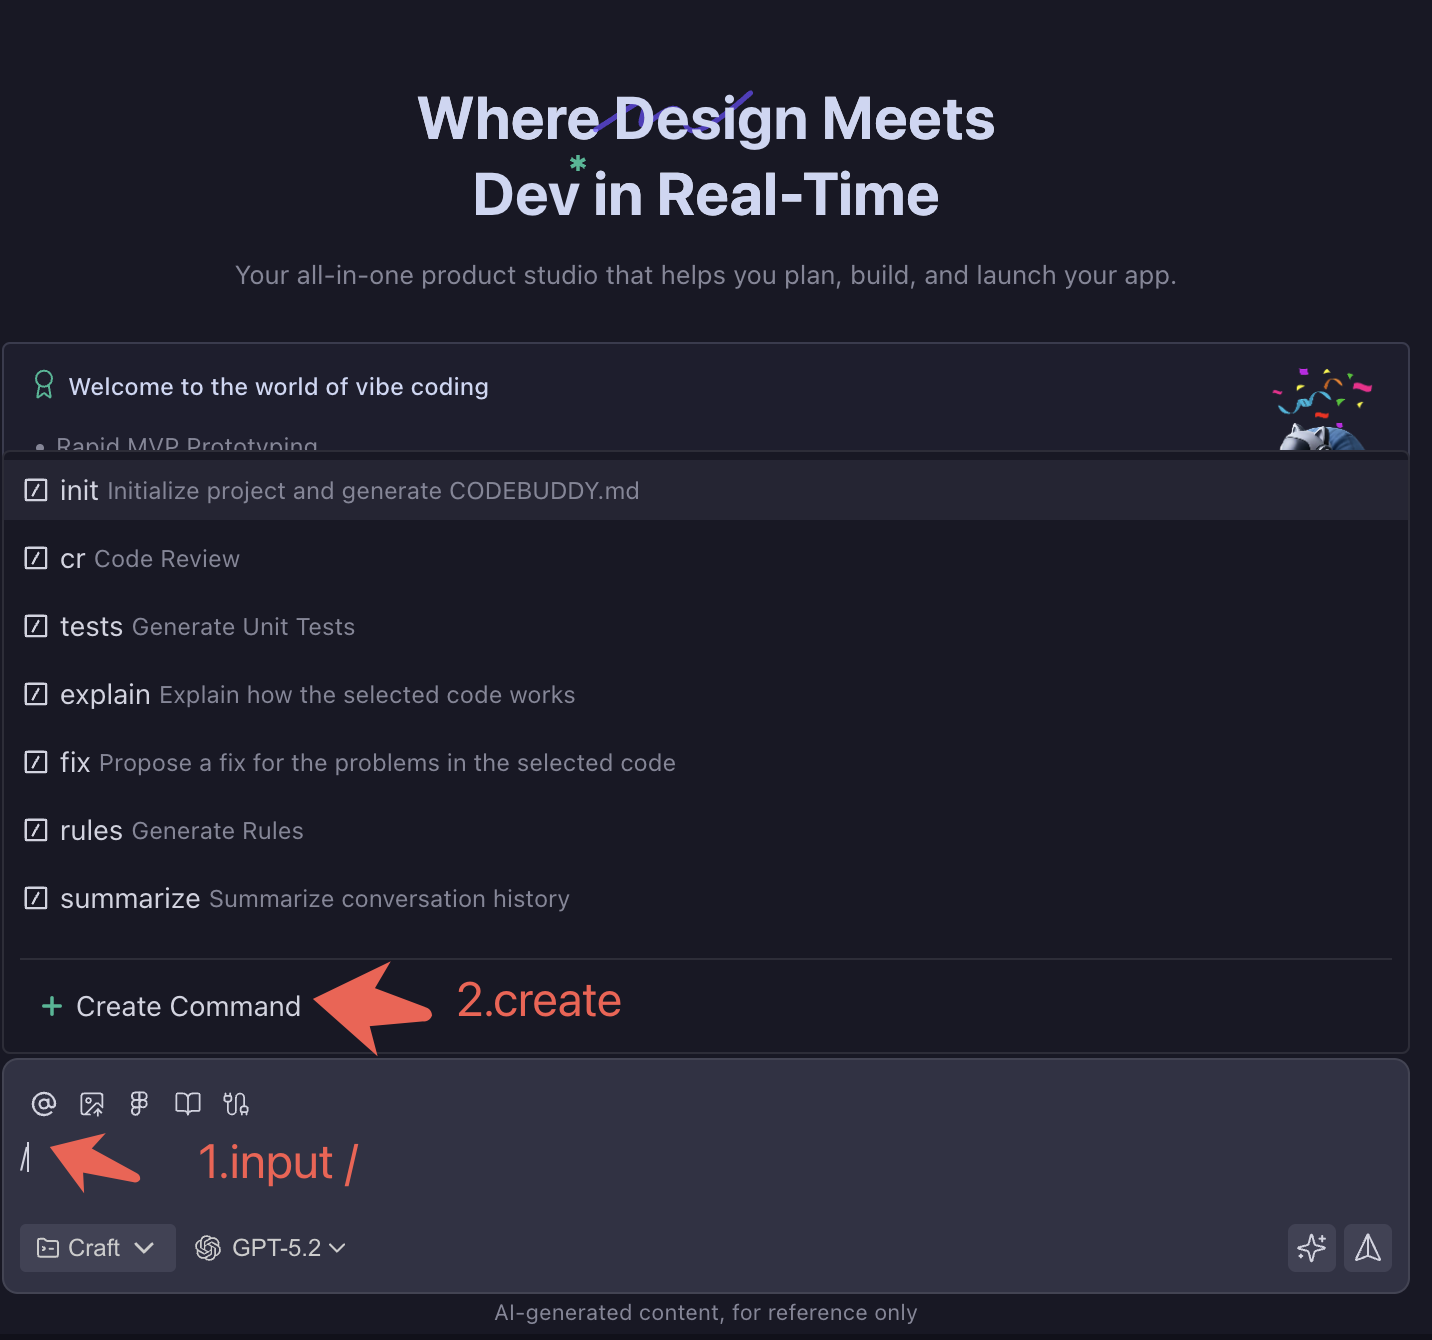
- Input
/to callCreate Commandinstruction - Define command name (e.g.,
kdy-report,tapd-todo,code-review) - Configure command MD file content
- Input
/command-namein dialog box for one-click trigger
Actual Command Example - Daily Report Generator:
markdown
---
description: "Ultra-fast daily report generation - Auto-generate today's work summary in 10 seconds"
aliases: ["daily", "standup", "report"]
---

# Ultra-fast Daily Report Generation

## Usage
Generate daily/weekly report
Write daily/weekly report
What did I do today/this week
Actual Command Example - TAPD Todo Query:
markdown
---
allowed-tools: Bash(curl:*), Bash(jq:*), Write, Read
description: Use TAPD MCP Server to query todos, generate priority plans
---

# TAPD Todo Query and Plan Generation Tool

## Workflow
1. Get data from TAPD system
   ├─ Pending stories
   ├─ Pending bugs
   └─ Pending tasks

2. Categorize and sort by priority
   ├─ High (Urgent - 1-2 days)
   ├─ Middle (Medium - 3-5 days)
   └─ Low (Normal - 7+ days)
Step 3: Establish Command Library Classification System
- Development Efficiency: Code generation, refactoring, testing, documentation
- Project Management: Requirement creation, progress tracking, daily/weekly reports
- Code Quality: Security review, performance optimization, compliance checking
- Collaboration Communication: Meeting minutes, technical sharing, issue summaries
Step 4: Actual Usage Effect Validation
- Daily Report Generation: From 15 minutes manual writing to 30 seconds AI generation
- Requirement Creation: From 5 minutes form filling to 1 minute voice description
- Code Review: Automated security, performance, compliance three-dimensional checking
- Todo Management: Cross-system data integration, intelligent priority sorting
2.2 Reducing Context Token Consumption Practical Tips
CodeBuddy Efficient Context Management Tutorial and Practical Tips for Reducing Token Consumption
- Core Value: Understand context window mechanisms, master cost control
- Practice Highlights: Token billing principles, context management strategies
- Suitable Scenarios: Developers concerned with cost control and efficiency optimization
Detailed Practice Operations: Click "CodeBuddy Efficient Context Management Tutorial and Practical Tips for Reducing Token Consumption" for more details
Step 1: Understanding Token Billing Mechanism
Billing Model Analysis:
- Input Tokens: All text you send to AI (including conversation history, file content, instructions)
- Output Tokens: AI-generated response content
- Context Window: Maximum number of tokens AI can "remember" (typically 32K-128K)
- Cost Structure: Input tokens are cheap, output tokens are more expensive (about 3-5x price difference)
Actual Cost Cases:
- One complete code review: about 1000-3000 tokens
- Long conversation (50 rounds): may consume 20K-50K tokens
- Large file analysis: single file may be 10K+ tokens
Step 2: Context Management Strategies
Segmented Conversation Techniques:
- Functional Module Separation: Use different conversation windows for different functions
- Periodic Summarization: Actively summarize key information every 10-15 conversation rounds
- Context Cleanup: Regularly start new conversations, keep only necessary information
- File Reference Optimization: Only @ needed file fragments, avoid full-text references
Smart Reference Methods:
bash# Inefficient way @entire project folder # May introduce tens of thousands of tokens # Efficient way @src/components/Login.tsx:1-50 # Only reference needed line numbers @README.md # Only reference key documentsStep 3: Long Conversation Optimization Techniques
Structured Conversation Management:
- Topic Marking: Use clear titles to distinguish different discussion topics
- Decision Recording: Summarize important decisions in concise language
- Code Snippet Management: Avoid repeatedly pasting the same code
- Progressive Refinement: Discuss big framework first, then dive into details
Practical Operation Tips:
- Send only changed parts after each modification, not complete files
- Use "based on previous discussion" rather than re-describing background
- Make good use of CodeBuddy's file diff feature, focus only on changes
- Regularly export important conversation content to avoid information loss
Step 4: Cost Control Best Practices
Daily Usage Habits:
- Batch Processing: Combine similar problems to solve in one conversation
- Template Reuse: Save common prompts as custom commands
- Precise Questioning: Clear specific needs, avoid vague descriptions leading to multiple clarifications
- Result Verification: Test in small scope first, confirm direction before large-scale application
Team Collaboration Optimization:
- Establish team-level best practice documentation
- Share efficient prompt templates
- Regularly review token usage, optimize workflows
- Train team members to master cost control techniques
2.3 Cross-Domain Applications
Everyone Can Learn CodeBuddy PPT Writing Guide
- Core Value: Efficient application of AI in non-programming scenarios
- Practice Highlights: Document generation, presentation creation, content structuring
- Suitable Scenarios: Product, operations, marketing personnel who need to create presentation documents
Detailed Practice Operations: Click "Everyone Can Learn CodeBuddy PPT Writing Guide" for more details
Step 1: Preparation - Installing CodeBuddy
Currently, CodeBuddy IDE & CodeBuddy Code CLI and Plugin all support Skills. The following uses CodeBuddy IDE as an example:
- Official website: /
- Operation manual: /docs/ide/Quick%20Start
Step 2: Skill Package Installation and Initial Experience
Since we need to write PPT, we need to install Skills packages with presentation creation, editing, and analysis capabilities. Currently, there are official Skills packages from Anthropics on GitHub, where the document-skills package contains 4 Skill configurations for docx, ppt, pdf, xlsx, meeting the needs for creating, editing, and analyzing Word, PPT, PDF, Excel file types.
Installing document-skills package in CodeBuddy IDE (for non-professional developers):
- Download installation package locally and double-click to extract
- Open CodeBuddy IDE, create local folder
- Enter configuration page, find Skill configuration path (user Skill is global configuration, configure once and use in any folder)
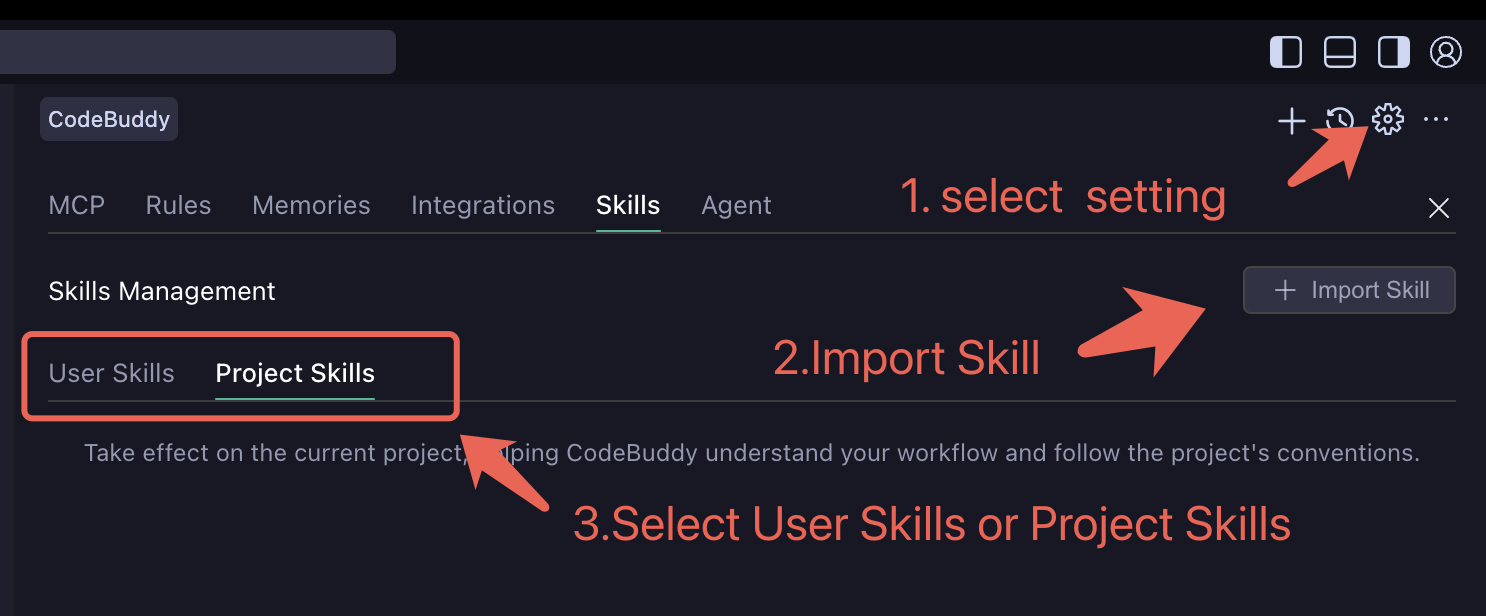
- Import user-level Skill
- Check if configuration is successful
- (Optional) Import xlsx, pdf, docx Skills for installation, fully covering office scenarios
Initial Skills Experience:
In CodeBuddy dialog box, select Agent mode, select model, input the following Prompt:
textFor non-professional developers, based on website content, write an introduction PPT, background color using Tencent Blue #0161FF, name PPT as Tencent Blue VersionOperation Guide:
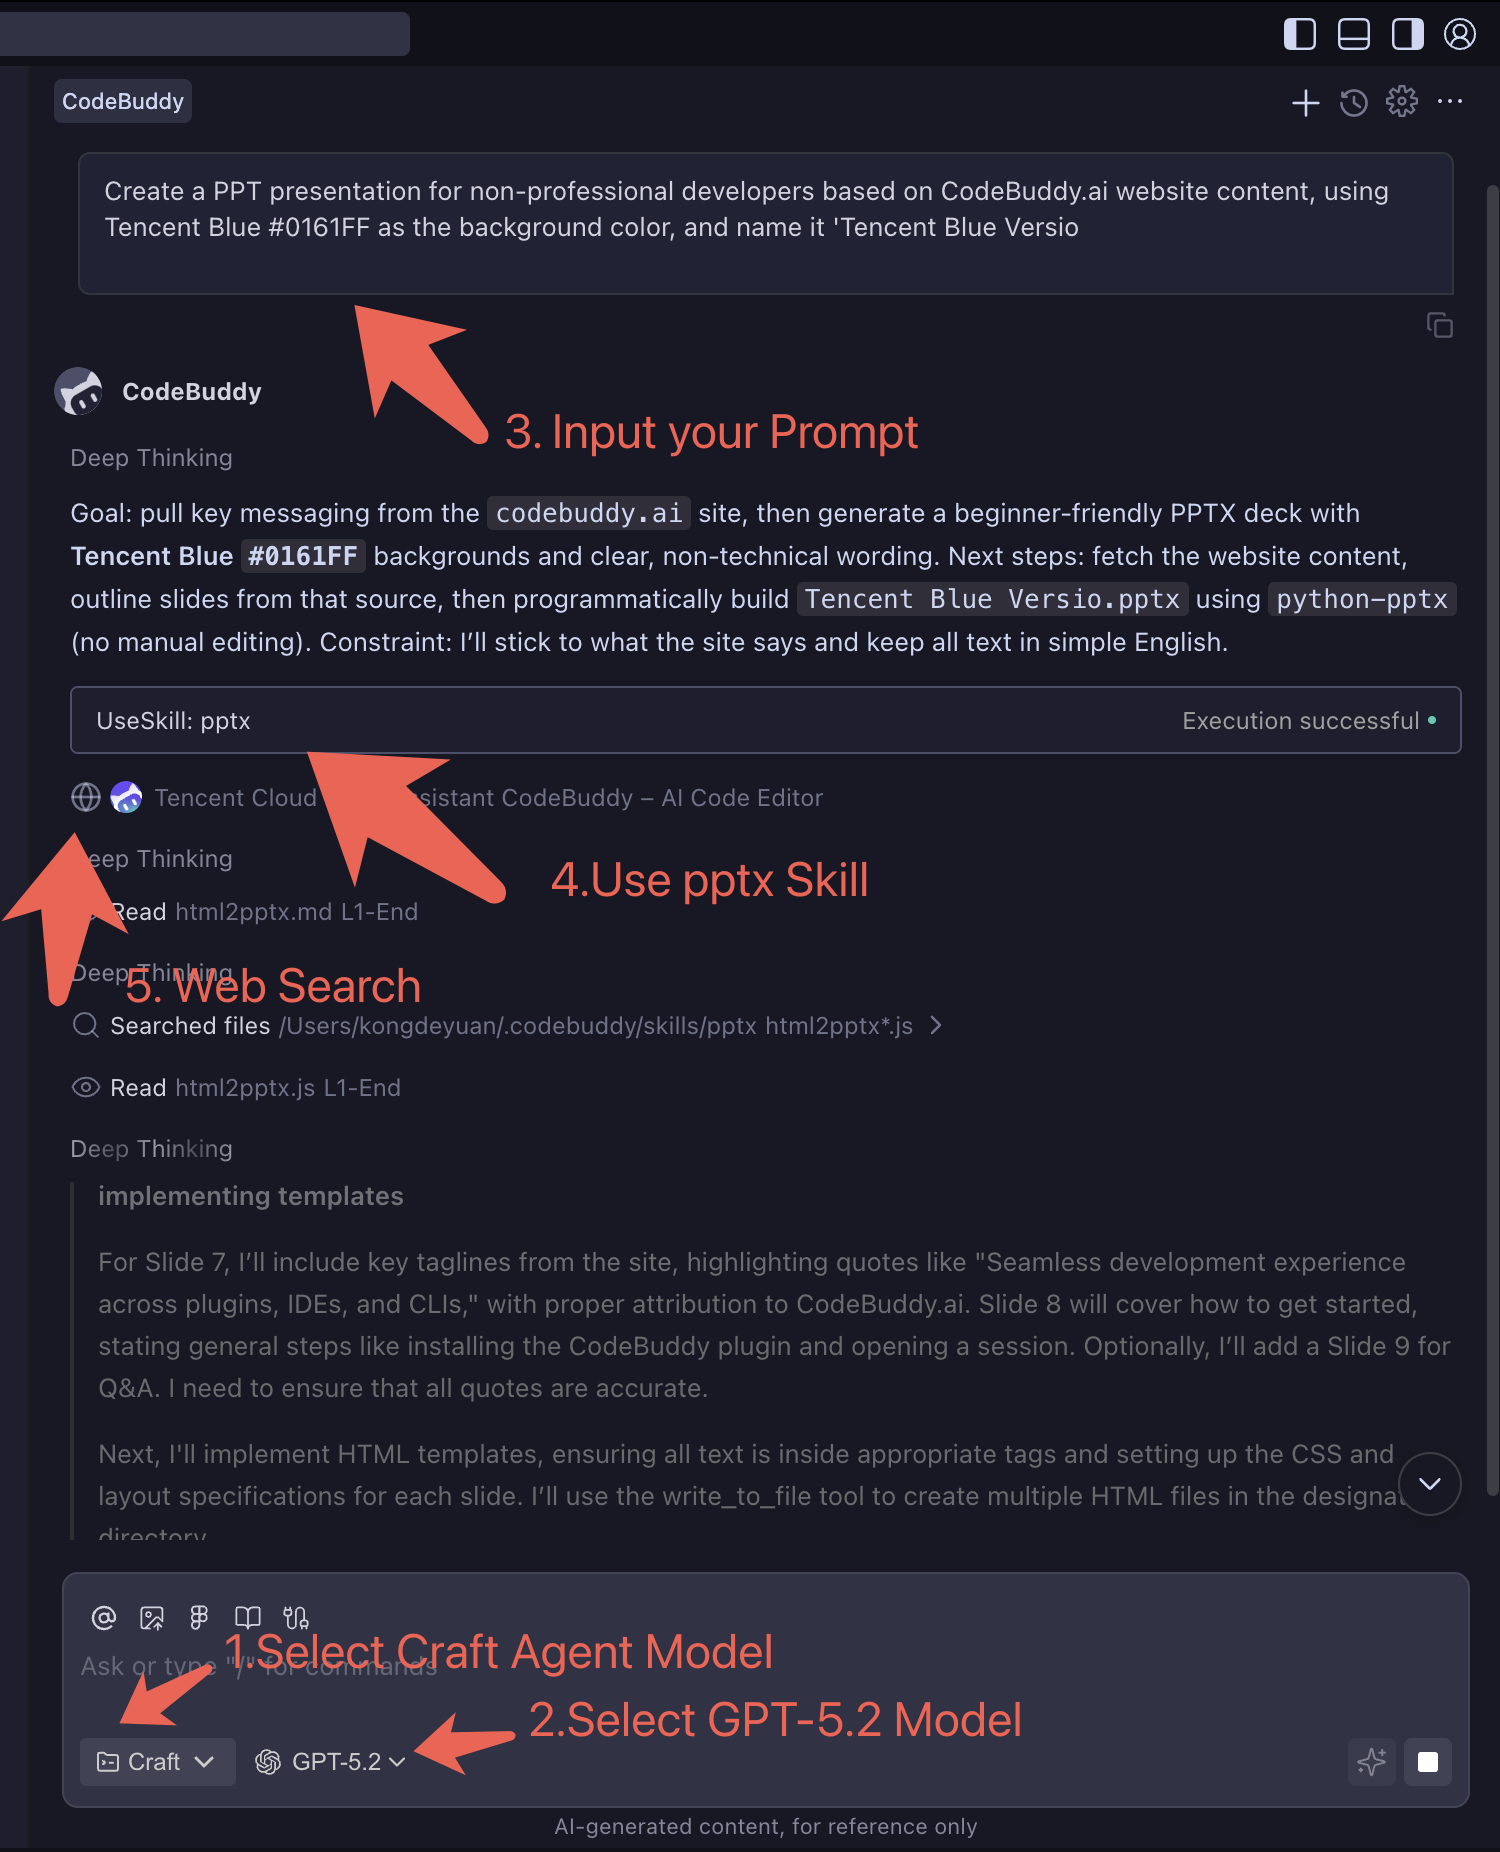
Effect Example:
Step 3: PPT Content Framework Construction
AI-Assisted Outline Generation:
- Scenario Description: Describe PPT goals, audience, duration, core information to AI in detail
- Structured Output: Require AI to generate three-level structure of "title-subtitle-points"
- Logic Check: Ensure content logic is clear, well-layered, and highlights are prominent
- Time Allocation: Reasonably allocate content proportion for each part based on presentation duration
Practical Operation Example:
textI need to create a 20-minute technical sharing PPT, theme is "Landing Practice of AI Programming Tools in Teams", audience is company's technical team, hoping to share our team's experience and effects using CodeBuddy. Please help me generate a complete PPT outline structure.Step 4: Content Generation and Optimization
Page Content Creation:
- Title Page: Eye-catching main title and subtitle design
- Table of Contents: Clear chapter navigation and expected gains
- Content Pages: 3-5 points per page, avoid information overload
- Summary Page: Core viewpoint review and action recommendations
Copy Quality Enhancement:
- Data Support: Use specific numbers and cases to enhance persuasiveness
- Storytelling: Package boring data into vivid stories
- Golden Sentence Refinement: Refine 1-2 memorable points for each chapter
- Audience Language: Use terminology and expressions familiar to target audience
Step 5: Skills Feature Template Production
PPT Skills Toolkit:
- Outline Generator: Input theme and requirements, automatically generate structured outline
- Content Expander: Expand key points into complete page content
- Chart Advisor: Recommend suitable visualization methods based on data types
- Speech Generator: Convert PPT content into speeches and notes
Template Library Construction:
- Report Templates: Work summaries, project progress, achievement displays
- Training Templates: Technical sharing, best practices, experience transfer
- Proposal Templates: Project initiation, resource requests, solution comparisons
- Marketing Templates: Product introductions, customer demonstrations, business proposals
Step 6: Multimedia Content AI-Assisted Creation
Visual Element Design:
- Color Schemes: Generate color suggestions based on theme and brand requirements
- Icon Selection: Match appropriate icons and symbols for different concepts
- Layout Design: Optimize page layout, enhance visual hierarchy
- Animation Effects: Design appropriate page transitions and element animations
Data Visualization:
- Chart Type Selection: Bar charts, line charts, pie charts, scatter plots, etc.
- Data Cleaning: Organize and format raw data
- Trend Analysis: Mine stories and insights behind data
- Interactive Design: Add interactive explanations for complex charts
Practical Application Tips:
- Use AI-generated content as first draft, then manually refine
- Maintain brand consistency, ensure visual style meets company standards
- Adjust content depth and expression for different audiences
- Reserve interactive sessions to enhance presentation effect and audience participation
Level 3: Engineering Practices
Target Audience: Team leaders, architects, developers hoping to scale AI applications Learning Objectives: Master team collaboration, engineering practices
3.1 Team Collaboration and Standards
Spec-Kit Specification Programming (Spec Coding) Exploration Practice Based on CodeBuddy
- Core Value: Establish team-level AI programming standards and workflows
- Practice Highlights: Spec-driven development, team collaboration models, code quality assurance
- Suitable Scenarios: Development teams hoping to standardize AI programming processes
Detailed Practice Operations: Click "Spec-Kit Specification Programming (Spec Coding) Exploration Practice Based on CodeBuddy" for more details
Step 1: Establish Spec Standard System
- Define requirement description templates: feature overview, user stories, acceptance criteria
- Create technical specification formats: API design, data models, architecture diagrams
- Establish code standards: naming conventions, comment standards, code structure
- Formulate review processes: Spec review, technical review, acceptance testing
Step 2: Spec-Kit Tool Practice
- Install and configure Spec-Kit toolchain
- Create project templates: automatically generate project structure based on Spec
- Implement Spec parsing: convert requirement documents into executable code
- Integrate CI/CD: automated testing, deployment, documentation generation
Step 3: Spec-Driven Development Process
- Requirements analysis phase: Product managers write functional Spec
- Design phase: Architects complete technical Spec and API design
- Development phase: Developers code implementation based on Spec
- Testing phase: QA writes test cases based on Spec
- Acceptance phase: Functional acceptance against Spec
Step 4: Quality Assurance Mechanism
- Code review: Spec-based code quality checking
- Automated testing: unit testing, integration testing, end-to-end testing
- Documentation synchronization: code changes automatically update Spec documents
- Continuous improvement: collect feedback, optimize Spec standards and processes
3.2 Enterprise-Level Project Practice
- Core Value: Complete enterprise application development process
- Practice Highlights: Full-stack development, database design, deployment and operations
- Suitable Scenarios: Development teams needing to rapidly deliver enterprise applications
Detailed Practice Operations: Click "Rapidly Building Enterprise CRM: Achieving One-Stop Frontend and Backend Development and Deployment with CodeBuddy" for more details
Step 1: CloudBase Cloud Development Environment Setup
Environment Configuration: Cloud database, cloud functions, cloud storage, cloud hosting
Development Toolchain: CodeBuddy IDE + CloudBase CLI, Git version control, debugging monitoring, CI/CD deployment
Step 2: AI-Assisted Data Model Design
CRM Core Entities: Customer management, sales management, product management, user permissions
Database Design Practice:
javascript// AI-generated customer entity model const CustomerSchema = { id: String, name: String, company: String, contacts: [{ type: String, // phone, email, wechat value: String, isPrimary: Boolean }], tags: [String], status: String, // lead, prospect, customer, inactive assignedTo: String, // assigned sales ID createdAt: Date, updatedAt: Date }Step 3: Frontend-Backend Separation Architecture Implementation
Backend API: RESTful design, JWT authentication, data validation, unified error handling
Frontend Architecture: React/Vue + TypeScript, state management, route permissions, component reuse
Step 4: DevOps Automated Deployment
One-Click Deployment: Code commit → Automated testing → Build packaging → Environment deployment
Monitoring and Operations: Performance monitoring, error monitoring, business monitoring, security monitoring
3.3 Enterprise Scenario Landing Practice
CodeBuddy AI Coding Enterprise Scenario Landing Practice and Reflections
- Core Value: Systematic enterprise-level AI Coding landing methodology
- Practice Highlights: Team diagnosis, tool selection, process improvement, effect evaluation
- Suitable Scenarios: Enterprise technical managers, team leaders promoting AI Coding landing
Detailed Practice Operations: Click "CodeBuddy AI Coding Enterprise Scenario Landing Practice and Reflections" for more details
Step 1: Team Development Process Diagnosis
- Draw complete team development process diagram (requirements analysis → development → testing → deployment → operations)
- Identify pain points for each role: Product managers (frequent requirement changes), developers (repetitive work), testers (time-consuming regression testing)
- Quantitative analysis: code writing time ratio, bug fixing time, deployment frequency and other key indicators
- Evaluate team AI acceptance and tech stack compatibility
Step 2: AI Coding Tool Selection Framework
- Technical compatibility assessment: existing tech stack support, learning costs, integration difficulty
- Team acceptance research: understand team attitudes toward AI tools through surveys and interviews
- ROI calculation model: expected efficiency improvement vs tool costs and training investment
- Develop tool selection matrix: feature coverage, usability, cost, technical support
Step 3: Progressive Landing Strategy
- Individual Phase: Select 1-2 technical leaders to try first, accumulate success cases
- Group Phase: Promote within one project group, establish best practice templates
- Team Phase: Team-wide promotion, establish training system and support mechanisms
- Organization Phase: Cross-department promotion, establish enterprise-level AI Coding standards
Step 4: Effect Evaluation and Continuous Optimization
- Establish key indicator system: development efficiency improvement, code quality improvement, bug reduction rate
- Regularly collect feedback: monthly team reviews, quarterly effect evaluations
- Continuously optimize processes: adjust tool configurations and usage methods based on data feedback
- Knowledge precipitation: establish enterprise-level AI Coding knowledge base and best practice documentation
Level 4: Advanced Applications
Target Audience: Technical experts, innovation practitioners Learning Objectives: Explore cutting-edge applications of AI programming
4.1 Capability Extension and Ecosystem
AI Programming Practice Driven by CodeBuddy + Skills
- Core Value: Build professional domain AI capability systems
- Practice Highlights: Skills development, capability assembly, knowledge precipitation
- Suitable Scenarios: Technical experts and teams hoping to build professional capability systems
Detailed Practice Operations: Click "AI Programming Practice Driven by CodeBuddy + Skills" for more details
Step 1: Understanding Skills Essence and Value
Skills Core Concept: Transform expert experience into reusable AI capabilities, achieving domain specialization and capability modularization
Application Scenarios: Code review, documentation generation, test cases, deployment and operations
Step 2: Professional Domain Skills Development
Skills Development Process:
- Requirements Analysis: Identify team tasks with high repetition and strong professionalism
- Knowledge Extraction: Collect expert experience, best practices, standard processes
- Capability Design: Define input/output, processing logic, exception handling
- Testing Validation: Validate Skills effectiveness and accuracy in real scenarios
Technical Implementation Methods:
python# Skills Example: Code Quality Check class CodeQualitySkill: def analyze_code(self, code, language, focus_areas): """ Code Quality Analysis Skills Input: Code snippet, programming language, focus areas Output: Issue list, improvement suggestions, scoring """ results = { 'security_issues': self.check_security(code), 'performance_issues': self.check_performance(code), 'style_issues': self.check_style(code), 'suggestions': self.generate_suggestions(code) } return resultsStep 3: Skills Ecosystem Construction and Assembly
Capability Assembly Modes: Serial, parallel, conditional, loop assembly
Ecosystem Management: Unified repository, capability catalog, usage statistics, continuous optimization
Step 4: Knowledge Precipitation and Capability Inheritance
Extract project experience into reusable methodologies, achieve new employee training, expert experience inheritance, and cross-team collaboration through Skills
4.2 Automated Testing and MCP
- Core Value: AI-driven end-to-end test automation
- Practice Highlights: MCP protocol, automated testing, AI agents
- Suitable Scenarios: Technical teams pursuing ultimate efficiency and automation
Detailed Practice Operations: Click "Efficiency Revolution: CodeBuddy + Chrome MCP Reshaping E-commerce Development and Automated Testing New Paradigm" for more details
Step 1: AI Rapid E-commerce Website Construction
E-commerce Core Functions: Product display, shopping cart, user system, payment process
Development Strategy: Use mature templates, component reuse, third-party API integration, responsive design
Step 2: Chrome DevTools MCP Integration
Understanding MCP Protocol:
- Model Context Protocol: Standardized communication protocol between AI and browser
- Core Capabilities: Page operations, element location, network monitoring, performance analysis
- Intelligent Interaction: AI understands page structure, automatically generates operation sequences
Technical Architecture Design:
javascript// Chrome MCP Connection Example const chromeMCP = new ChromeMCPClient({ endpoint: 'ws://localhost:8080/mcp', capabilities: [ 'page_navigation', 'element_interaction', 'network_monitoring', 'performance_analysis' ] }); // AI-Driven Test Cases const testCase = { name: 'User Purchase Process Test', steps: [ { action: 'navigate', url: 'https://shop.example.com' }, { action: 'click', selector: '.product-item:first-child' }, { action: 'click', selector: '.add-to-cart-btn' }, { action: 'verify', condition: 'cart_count > 0' } ] };Step 3: AI Agent-Driven End-to-End Testing
Intelligent Testing Process:
- AI generates test scenarios and analyzes page structure
- Automatically execute test steps, simulate user behavior
- Intelligently analyze results and identify anomalies
Test Coverage:
- Comprehensive testing of functionality, interface, performance, compatibility
- Intelligent retry, error location, screenshot recording
Step 4: Complete Automation Closed Loop from Development to Validation
Continuous Integration Process: Code commit → Automated build deployment → AI test execution → Result feedback
Effect Improvement:
- Development cycle shortened by 50%+, test coverage reaches 80%+
- Bug fixing speed improved by 3x, reduced manual testing costs
Practice Case Details
Typical Practice Case Showcase
Based on the above best practices guide, we provide detailed practice cases showing the complete learning path from zero foundation to advanced applications. Each case includes:
- Complete Operation Steps: Detailed practical operation guidance
- Core Technical Points: In-depth analysis of key technologies and methods
- Actual Effect Validation: Quantifiable effect data and achievement display
- Related Resource Links: Supporting tutorial documents and code examples
More Learning Resources
Detailed tutorial documents can be viewed by clicking corresponding article links, and welcome to follow the "Tencent Cloud Code Assistant CodeBuddy" official account for more information.
Welcome everyone to use CodeBuddy and explore best practices!